T-SHIRT RAG RUGS


I have 4 amazing children and with that comes bags and bags of outgrown clothing to sell at my annual garage sale. Some of their clothes such as baby clothes, special shirts, and other shirts from trips and other stuff I would keep for them, or hey lets just admit it, I am a mom, so I kept some for my own memories! These items would sit in boxes in my storage. One day I was looking at Pintrest and found an article about how to turn your old shirts into rag rugs. Of course the kids and I just HAD to try it! This started a spring cleaning of our closets and we found tons of great old shirt to use.

  We started with one rug and now have tons of rag rugs all over my house.  I even made rugs for each of my kids made from their favorite shirts, baby and also other shirts that were theirs. The kids love them and they have so much fun looking at them. They like to see if they remember the shirt and where it was from. This is such a fun project and the best part of all…..ITS FREE!!  Weaving a t-shirt rug is fun and super easy, even my 3 year old helps make rugs. It is a simple in and out weave and the children are fascinated when they create such amazing rugs!!

WHAT YOU WILL NEED

  • OLD T SHIRTS (10 should be fine depending on size of clothing)
  • SCISSORS
  • HOLA HOOP

STEP ONE

Lay the t-shirt flat and start cutting trips of fabric. My strips are about an inch thick but you are defiantly able to experiment with the thickness. It will create a thicker texture to your rug. Make sure you cut from left to right ( across the width) of the shirt. When you cut your strip it should form a fabric loop which will be used as weaving material.

STEP TWO

Now take 11 of the fabric loops and your hola hoop. You are going to take the fabric and stretch them over the hola hoop like in my photo. This is the skeleton of your rug. When stretching the first two fabric loops create a cross shape and then continue to add the other loops evenly apart.
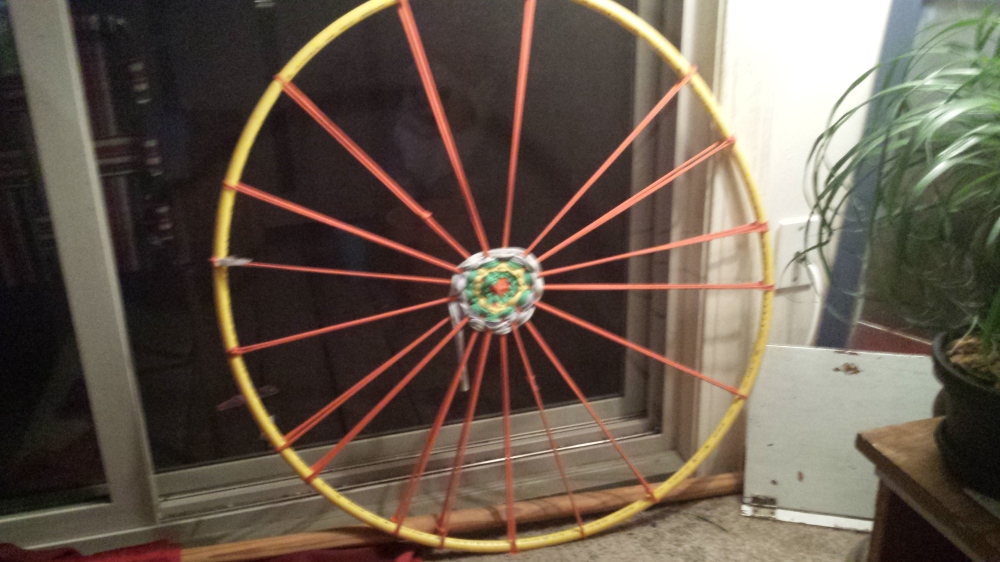
20160504_022831

STEP THREE

Push together 2 of the loops.

STEP FOUR

It is time to start weaving the rug!  Take a fabric loop and tie it to one of the fabric skeleton loops on the hola hoop. When you “tie” it, this means to pull the fabric loop through itself which will tie it on. Pull it tight so that it is snug.

STEP FIVE

Start weaving in and out of the skeleton loops on the hoop. Make sure to push the fabric down and also tight when you are weaving. Do not pull to tight or it my cause lumps in your rug. I personally had one that was so bubbled that it almost formed a fabric bowl!  So take it slow and watch your fabric.

STEP SIX

When your first fabric loop is at the end, you will add another piece of fabric loop by threading the new loop through the the other loop and then through itself. Pull tight so that it because an extension of the other fabric loop. Continue to weave in and out of the skeleton loops until you have reached the size rug you would like.20160504_023024

STEP SEVEN

ALMOST DONE!! I love this part the best!  You get to see your final creation!  Now that you have the size rug you want, start cutting the skeleton loops that are stretched over the hoop closer to the rug. After cutting one, tie the loop in knot which will tie it off. Continue this all the way around till your rug is off the hoop.20160504_022839

STEP EIGHT

You can cut the ends and let them stick out to give that rag rug look or you can tuck them in for a clean edge. Now just find a perfect spot and enjoy!!

I was so fascinated by the rug that I just had to see what other ideas there were on up-cycled t shirts. Wow, did I find some amazing ones!!  I just had to share them with you guys. Enjoy and create!!

OTHER AMAZING AND FUN T-SHIRT PROJECT IDEAS!!

Make An Amazing New Bag! NO SEW

Make A Memory Pillow! NO SEW

Make Your Own Headband!! NO SEW

Make Fun Canvas Art!!

Hang Your Plants In Style!! NO SEW

Fun Toys For Furry Friends! NO SEW

Warm Yourself With A Memory Blanket!

Printables+Crayons=FAMILY FUN!

Crayons are starting to have a new use in the art world. This art is called crayon melting. This is where you melt crayons in different ways to create art or add spurs of color to a piece of art. I like to call it crayon art because that is what it is! You are taking a white canvas and melting crayons over the top of the canvas to make your own unique piece of art.  I love to do crayon art and so do my kids! When I first started to do crayon art, I would draw a lot of my images onto the canvas. When my children took interest to this activity, I couldn’t keep up with their requests. I ran to the internet images for help. Going on the internet and finding images to cut out and piece together into your own picture is so fun for the kids. It is amazing what their little minds can create! I have even embraced printable images for some of my own canvas art. A great place to start looking for printable s is Pintrest. Follow this link, Pintrest Printouts to start looking for some ideas for your next crayon art piece. Once you find your images, just print them out. After this step comes the fun part! Melting the crayons and seeing what imaginations create!  Have fun melting!

20160314_001320

Some examples of my print outs after they are cut

THINGS YOU WILL NEED TO START YOUR OWN CRAYON ART PROJECT20160314_001935

  1. Canvas of any size.  The size I typically use is 12×16 when using print outs from the computer.  I feel it leaves the best amount of backdrop for your crayon art. The size will be for you to decide depending on the picture you chose and the effect you are looking for.
  2. Exacto knife and scissors will be needed to cut around the print out or picture you chose for your canvas.
  3. Painters Tape is great to use for this project. I personally like to use frog tape because it comes off cleaner and sticks better than regular painters tape.
  4. Plastic grocery bag or any plastic you find that could be used to cover the photo. Saran wrap has worked for me in the past if I double the wrap.
  5. Modge Podge
  6. Paint brushes of any size works but I really enjoy the sponge brushes with this project. They give a even layer of modge podge compared to bristle brushes.
  7. CRAYONS
  8. Hair dryer and/or glue gun depending on the effect you will want to achieve in the background.

STARTING THE CANVAS

Once you find your image or images and have printed them,  you will have to use the scissors/exacto knife to cut around the image. The exacto knife works the best around small areas. This is unfortunately time consuming especially on detailed images. I let the kids pick out the images and spend the night cutting. Then crayon art the following day.

Take your canvas and plan how you want your printouts to be laid out. Once you have your locations picked out take your paint brush and brush a light layer of modge podge on the canvas where the image will go. Once you lay the image down, go over the image again with a layer of modge podge. Let dry. Be very careful on the amount of glue you put on so that the image doesn’t bubble. I often use a credit card to flatten any bubbles.

20160314_001646Once your printables are glued into place, you will need to cut plastic to cover the image. Using the painters tape you will tape the plastic over the image. Once you are done with this step, it is time for the most fun part of all! Make sure you have newspaper laid down before starting.

Time for crayon melting!!  Now this can be done in many ways. Different ways can cause different effects with the crayons. I recommend using a hair dryer with kids, especially younger ones. 

Here are some other great ways to melt crayons

  • Glue/tape crayons to the top of the image. Use a blow dryer to melt crayons. Hold canvas in an upward position so the crayon melts down. This causes a dripping effect.
  • Shave the crayons into small shavings. The kids can sprinkle the colors where they want. Use blow dryer to melt. This causes puddles and little sprays of colors. Another option with this technique is using a toothpick to swirl and blend the colors how you like.
  • Using a glue gun can cause spray effects. I don’t recommend this with kids under 12 because the glue gun gets hot and sometimes the crayon will get stuck inside. This can also be a messy technique but makes great splatters of color.

You will notice that you will get different effects depending on how high the heat is, what tool you are working with to melt the crayons, and also how close you are to the canvas. Try different things and have fun creating with your kids! You will have amazing canvas art hanging around your home in no time!! For more ideas and techniques check out Pintrest Crayon Art Ideas. The ideas are endless!!

20160314_001658


Magical Paint!!

OK, so maybe chalkboard paint is far from magical but I do find it to be pretty amazing!!  I have been refurbishing furniture for a few years now. I have always had issues with making sure the paint went on right. With latex or spray paint it would a task to sure it didn’t bubble or drip. . The only downfall is that the paint will always be a flat paint. Which is an easy fix with a gloss coat seal.  Now, I do always hunt for the best price and Walmart has a great selection. Another great direction is Anne Sloan Brand. My kids enjoy going with to look at the color cards and help pick the paint. They can be a lot of help bringing out your imagination!!

Quick List of Why Chalkboard Paint is Fantastic!

  • A great paint for first time painters. This paint is easy to apply and doesn’t leave streaks or bubbles. This is a very flawless paint.
  • This paint is very little hassle. What I love most about this paint is that there is no need for sanding! Yes, I find this very exciting. Not only is this time saving but convenient. I always wipe the furniture down and give the piece a light hand sand but this is not necessary.
  • Has multi-uses Not only does this paint give a nice smooth look to any piece, it also allows you to write on anything with chalk! This feature can be a lot of fun especially on children’s furniture.
  • This paint now comes in tons of amazing colors!! This was a problem a few years ago, but thank you to ANNE SLOAN who came out with the first large line of colors in chalkboard paint, we have come a long ways. Check out her site for great colors and tips. Best part is that this paint dries bright and colorful. 
  • This paint can give your old furniture spark!  It is amazing what a quick coat of paint can do for any piece of furniture!  Don’t throw away old grubby pieces! Don’t pass up that free chair on the side of the road!  Paint can really help and make a piece look new. Check out my jewelry box below. It was ugly and coat of paint really made it look great!

Here is a piece that I found on the side of the road. It was ugly and dirty. Washed it, gave it a light hand sanding and painted it with chalkboard paint. It is one of my favorite pieces!!  It needed paint and that was it!  In the photos you can see the smoothness and the shine.

Introduction

Hello Fellow Artists!!

Hi! My name is Melissa. I have 4 beautiful children and a very naughty kitty. I live in Minnesota and am currently going to school. I am starting this blog to share my love of creating new things, refurbishing old furniture and other items, and just creating art out of items in general. I will be posting some of my own work as well as other amazing items I find along the way. I will be posting tutorials on some amazing do it yourself pieces! I hope this blog will be as fun for you to read as it will be for me to create!